肉饼博客

Talk is cheap. Show me the code.

0%

基于 MediaPipe 和 WebRTC 的 AR 魔法盾特效

魔法盾(magic shield)指的是下面这位的,熟悉漫威的朋友肯定都见过,记得我第一次看到的时候感觉还挺酷的
magic_shield

本文旨在记录并总结基于 WebRTC 和 MediaPipe 实现的上述 AR 魔法盾特效,主要内容包括:

  • MediaPipe Hand LandMarker 模型的使用
  • WebRTC 视频传输在前后端的实现
  • 使用 OpenCV 对模型输出进行后处理

实际效果如下:最多可以同时检测2只手,当手张开到一定程度会显示魔法盾

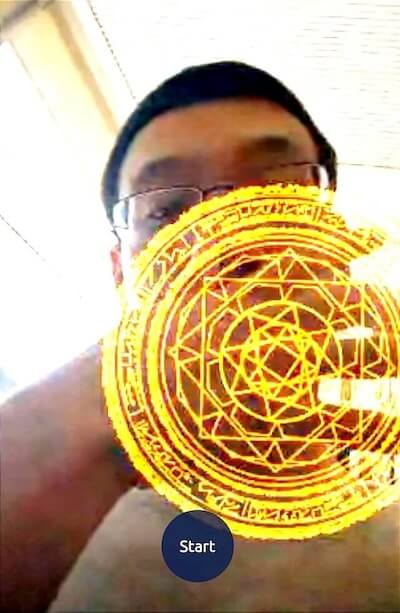
Demo地址:Next Web ML(注:因服务端算力有限,已对客户端连接数量和连接时长作了限制)

一、环境与架构

1.软硬件环境

硬件 配置
VGA Quadro K620 (Memory 2G, 0.863 TFLOPS)
CPU 9 x vCPU (Intel Xeon E312xx (Sandy Bridge))
Memory 12G
SSD 160G
软件 版本
OS CentOS 8 Stream
VGA Driver 550.78
CUDA 12.4
OpenGL ES 3.2
Python 3.10.14
MediaPipe 0.10.14
Numpy 1.26
OpenCV 4.10.0.84
aiortc 1.9.0
fastapi 0.111.0
redis 5.0.3

2.架构

架构
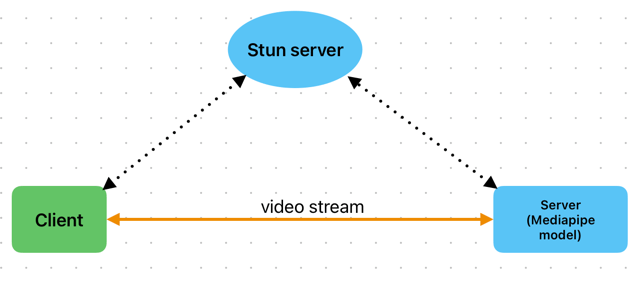
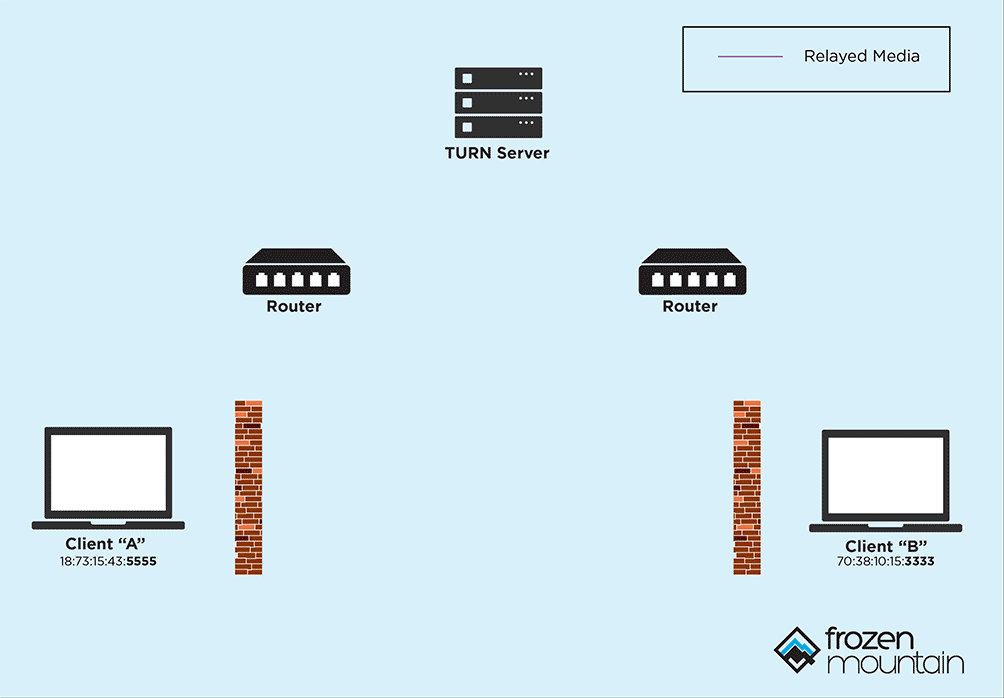
如上图,采用了一个典型的WebRTC架构,相较于前几次模型在client展开,这次将模型改到server端来推理。

通常,将模型部署到不同位置,会带来不一样的收益和问题:

模型位置 优点 缺点
client 低延迟、低成本、隐私安全 性能限制
server 高性能、灵活扩展 较高延迟、较高成本、隐私问题

可以看到client和server两者是互补的,所以业界会大力倡导发展端侧性能或采用云端结合的方式。

当然,作为开发者,还会考虑到架构复杂度和软件生态的问题。经过几轮实践后,对于cv应用,站在前后端的角度来看,我感觉基于js或python的实现,各自也存在着明显的优势/痛点:

优势 痛点
js 面向用户的ui构建和呈现方式更灵活多样 cv或者说ai相关生态还不完善
python ai相关生态更丰富且完善 面向用户的ui构建和呈现方式不够灵活

所以这次决定将模型放到server端推理,综合了如下几点考量:

  • 针对高延迟:了解到WebRTC可以较好地解决视频帧传输的延迟问题,值得尝试
  • 针对高成本:mediapipe基于TFLite,模型对端侧设备(当前场景下指server)有较好的优化,低配置的server也可以运行推理
  • 针对软件开发:由于当前AR效果需要相对复杂的post process,离不开opencv。尝试过一版基于opencv.js实现的纯client推理,目前的opencv.js需要手动内存管理,开发体验一般,有内存溢出的风险,而python的生态则更丰富和完善
  • 针对架构:结合js和python各自优势,采用c/s架构。其实针对c/s架构,还额外考虑过让模型仍然运行在client,需要post process时,将数据给到server来处理,但这样就涉及到帧同步问题,而且当前Web Worker对WebRTC DataChannel的支持还不够,实现起来有点复杂,且优势不明显,所以最终采用了更简洁的方式

二、WebRTC简介

1.核心概念

(1)ICE

WebRTC本身是一种用于音视频传输的peer-to-peer的技术,但是现实世界中,网络较为复杂,存在各种软硬件的阻隔(防火墙、路由器、NAT等),导致端与端不一定能相互连上,这时候就需要ICE(Interactive Connectivity Establishment,交互式连接创建)的帮忙,来绕过这些限制,ICE的核心是STUN/TURN。

(2)STUN

stun server
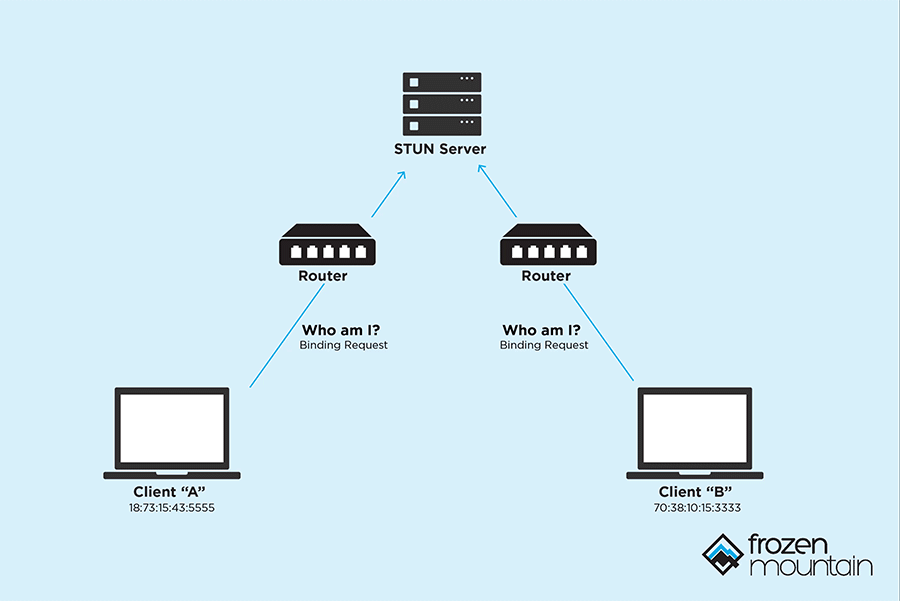
STUN(Session Traversal Utilities for NAT, NAT会话穿越功能),本质上就解决一个问题:帮client找出他们的公网ip和port。当两个client知道了自己的ip和port后,就可以相互直连进行通讯了,当然这是比较理想的情况

(3)Symmetric NAT 和 Cone NAT

Symmetric NAT 和 Cone NAT 都是网络地址转换(NAT)的一种类型,用于将内部网络上的私有地址转换为公网地址。

Cone NAT:在同一主机上,同一端口会被映射为相同的公网IP和端口。这意味着无论从哪个内部地址发起连接,NAT都会使用相同的外部端口号。

Symmetric NAT:每次请求一个新的外部地址时,NAT会分配一个新的外部端口号。即使是从同一个内部地址和端口发起的连接,每次请求也可能被映射到不同的外部端口号

下图列出了可能的NAT组合情况:
nat_combine

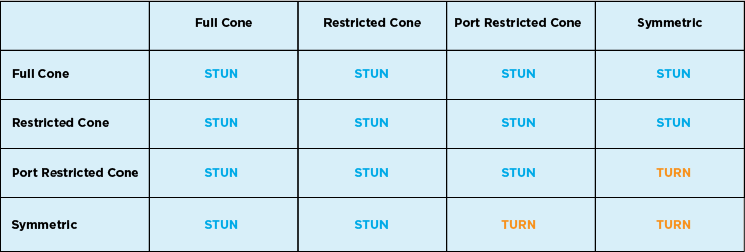
所以即使用上了stun server,还是存在无法绕过NAT的可能,这时候就需要turn出场了

(4)TURN


TURN(NAT中继穿越方式Traversal Using Relays around NAT),用于在对等连接失败时中继流量,当然这样就需要消耗额外的资源和带宽,还有隐私风险,所以网上有很多公开免费的stun server,却很少有免费的turn server。

(5)Server的优势

将server作为peer的一个显著优势,是server通常情况下都是reachable的,也就是说可以没有turn。当然,在连接建立后,还会受到网络质量、通信距离、带宽等的影响,如何保持稳定的连接,就是另外一个话题了。

(6)SDP

会话描述协议Session Description Protocol (SDP), 是一个描述多媒体连接内容的协议,例如分辨率,格式,编码,加密算法等,在数据传输时让两端都能够理解彼此的数据。

2.建立连接的流程

下面的代码部分:client webrtc用纯js实现(当然也可以选用peerjs等三方包),server使用python版aiortc实现

(1)client通过navigator.mediaDevices.getUserMedia()获取本地媒体
1
const stream = await navigator.mediaDevices.getUserMedia({ video: true }); // 这里只获取摄像头权限
(2)client创建一个RTCPeerConnection,并添加一些listener
1
2
3
4
5
6
7
8
9
10
11
12
13
14
15
16
17
18
19
20
21
22
23
24
25
26
27
28
29
30
31
32
33
34
35
36
37
38
39
40
41
42
43
const createPeerConnection = () => {
console.log("createPeerConnection");
const config = {
sdpSemantics: "unified-plan",
iceServers: [{ urls: [STUN_SERVER] }],
};

pc = new RTCPeerConnection(config);

// register some listeners to help debugging
pc.addEventListener(
"icegatheringstatechange",
() => {
console.log("ice gathering state change ->", pc.iceGatheringState,
);
},
false,
);

pc.addEventListener(
"iceconnectionstatechange",
() => {
console.log("ice connection state change -->", pc.iceConnectionState,
);
},
false,
);

pc.addEventListener(
"signalingstatechange",
() => {
console.log("signaling state change -->", pc.signalingState);
},
false,
);

// connect audio / video
pc.addEventListener("track", (evt) => {
console.log("get backend track ->", evt);
if (videoRef.current && evt.track.kind === "video")
videoRef.current.srcObject = evt.streams[0];
});
};
(3)client将音视频轨添加到PeerConnection中
1
2
3
4
5
6
stream.getTracks().forEach((track) => {
if (pc) {
console.log("add track");
pc.addTrack(track, stream);
}
});
(4)client创建offer,并设置为本地sdp描述
1
2
const offer = await pc.createOffer();
await pc.setLocalDescription(offer);
(5)client请求 STUN server 提供 ice 候选 (ice candidates)

stun server会返回多个ice候选,通过添加listener,我们可以看到相关信息:

1
2
3
4
5
pc.addEventListener("icecandidate", (evt) => {
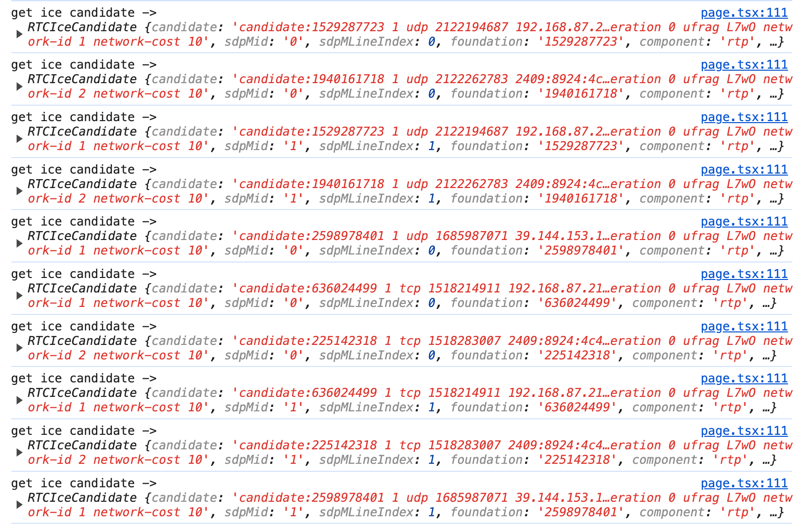
if (evt.candidate) {
console.log("get ice candidate ->", evt.candidate);
}
});

ice_candidate

单个candidate包含的信息如下:

1
2
3
4
5
6
7
8
9
10
11
12
13
14
15
16
address:"192.168.87.213"
candidate:"candidate:1529287723 1 udp 2122194687 192.168.87.213 63733 typ host generation 0 ufrag L7wO network-id 1 network-cost 10"
component:"rtp"
foundation:"1529287723"
port:63733
priority:2122194687
protocol:"udp"
relatedAddress:null
relatedPort:null
relayProtocol:null
sdpMLineIndex:1
sdpMid:"1"
tcpType:null
type:"host"
url:null
usernameFragment:"L7wO"
(6)client会通过一套算法,对获得的candidates进行过滤筛选,然后添加到offer中

对比添加candidates前后的offer,可以看到这里有5个candidates被加了进来
final_offer

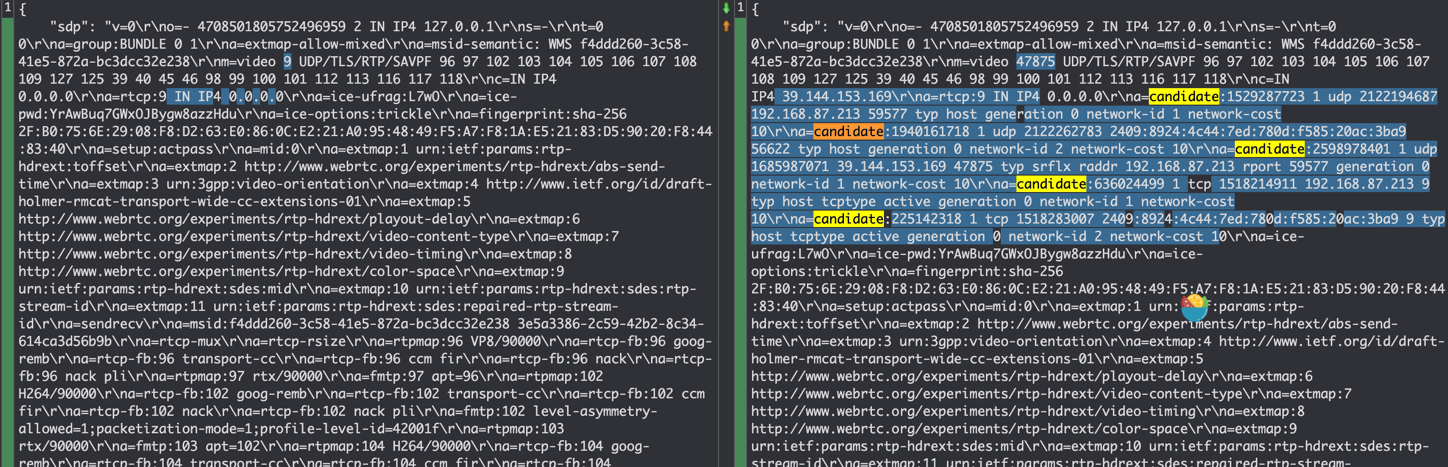
(7)开始signaling信令交换,client通过某种方式将offer发给server

这里的“某种方式”,在协议中并没有强制规定,可以是http、websocket等,如下是使用fetch的示例:

1
2
3
4
5
6
7
8
9
10
11
const response = await fetch(`${BACKEND_URL_PREFIX}webrtc/offer`, {
body: JSON.stringify({
sdp: finalOffer.sdp,
type: finalOffer.type,
video_transform: "shield",
}),
headers: {
"Content-Type": "application/json",
},
method: "POST",
});
(8)server接收offer,并创建一个peerConnection
1
2
3
4
5
@router.post("/offer", response_model=AnswerResponse)
async def handle_offer(req: OfferRequest, request: Request):
offer = RTCSessionDescription(sdp=req.sdp, type=req.type)
pc = RTCPeerConnection()
pc_id = f"PeerConnection({uuid.uuid4()})"
(9)server为peerConnection设置一些listener
1
2
3
4
5
6
7
8
9
10
11
@pc.on("connectionstatechange")
async def on_connectionstatechange():
logger.info(f"{pc_id} is {pc.connectionState}")

@pc.on("track")
def on_track(track):
logger.info(f"Track {track.kind} received")

@track.on("ended")
async def on_ended():
logger.info(f"Track {track.kind} ended")
(10)server将offer设置为远端sdp描述
1
await pc.setRemoteDescription(offer)
(11)server创建answer,设置为本地sdp描述,并将answer返回给远端
1
2
3
answer = await pc.createAnswer()
await pc.setLocalDescription(answer)
return {"sdp": pc.localDescription.sdp, "type": pc.localDescription.type}
(12)client接收到answer,将其设置为远端sdp描述
1
2
const answer = await response.json();
await pc.setRemoteDescription(answer);

至此,signaling完成,client和server都保存了自己和对方的sdp描述信息

(13)建立p2p连接

根据双方收集到的ice candidates,测试连通性,选择最优路径,建立p2p连接,这一步是协议自动完成的。

webrtc建立连接的整个流程,可以用下图来表示:
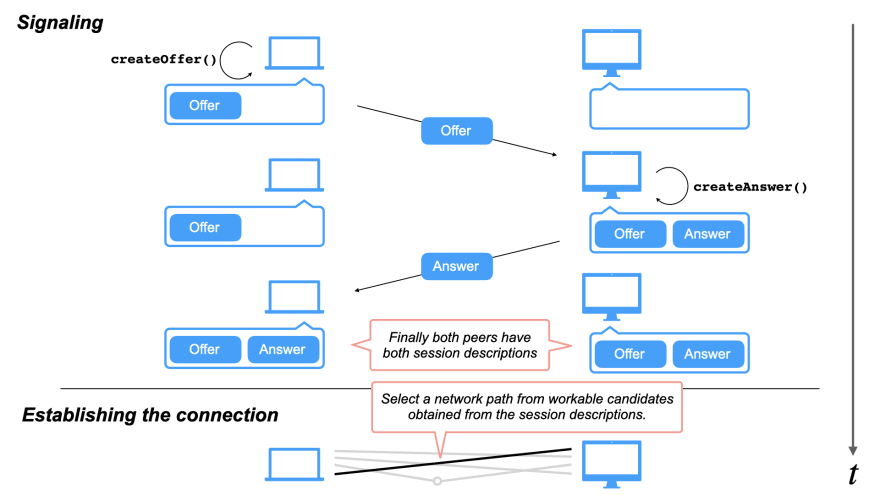
signaling

3.DataChannel

WebRTC中的DataChannel可以用来发送一些额外的数据,比如在视频会议中,可以发送文件或消息。

这里我是用来计算RTT和获取一些server端的资源信息:

1
2
3
4
5
6
7
8
9
10
11
12
13
14
15
16
17
18
19
// client
const createDataChannel = () => {
if (!pc) return;
dc = pc.createDataChannel("shield", {ordered: false, maxRetransmits: 0});
dc.addEventListener("close", () => {
clearInterval(dcInterval);
console.log("data channel closed");
});
dc.addEventListener("open", () => {
console.log("data channel opened");
dcInterval = window.setInterval(() => {
const message = "ping " + performance.now();
dc && dc.send(message);
}, 1000);
});
dc.addEventListener("message", (evt) => {
cnosole.log("server message", evt.data)
})
}
1
2
3
4
5
6
7
8
# server
@pc.on("datachannel")
def on_datachannel(channel):
@channel.on("message")
def on_message(message):
pcs[pc_id]["channel"] = channel # 保存datachannel的引用
if isinstance(message, str) and message.startswith("ping"):
channel.send("pong" + message[4:] + f" {psutil.cpu_percent()} {len(pcs)}")

三、MediaPipe简介

1.什么是MediaPipe?

mediapipe
MediaPipe是Google Research开发并开源的一款跨平台多媒体机器学习应用框架,用于构建基于机器学习的应用程序,特别是涉及到计算机视觉、音频处理、姿势估计等领域。

MediaPipe包括了MediaPipe Solution、MediaPipe Framework等。我这次用到的是Solution,它基于MediaPipe Framework构建,提供了很多现成的解决方案,如人脸检测、手势识别、姿态估计等,可以快速的集成到自己的应用中,并且支持多种平台,包括移动设备、桌面和网页。

2.MediaPipe Hand Landmarker

该模型可以检测手部关键点,基于这些关键点信息,我们可以用来构建视觉渲染效果
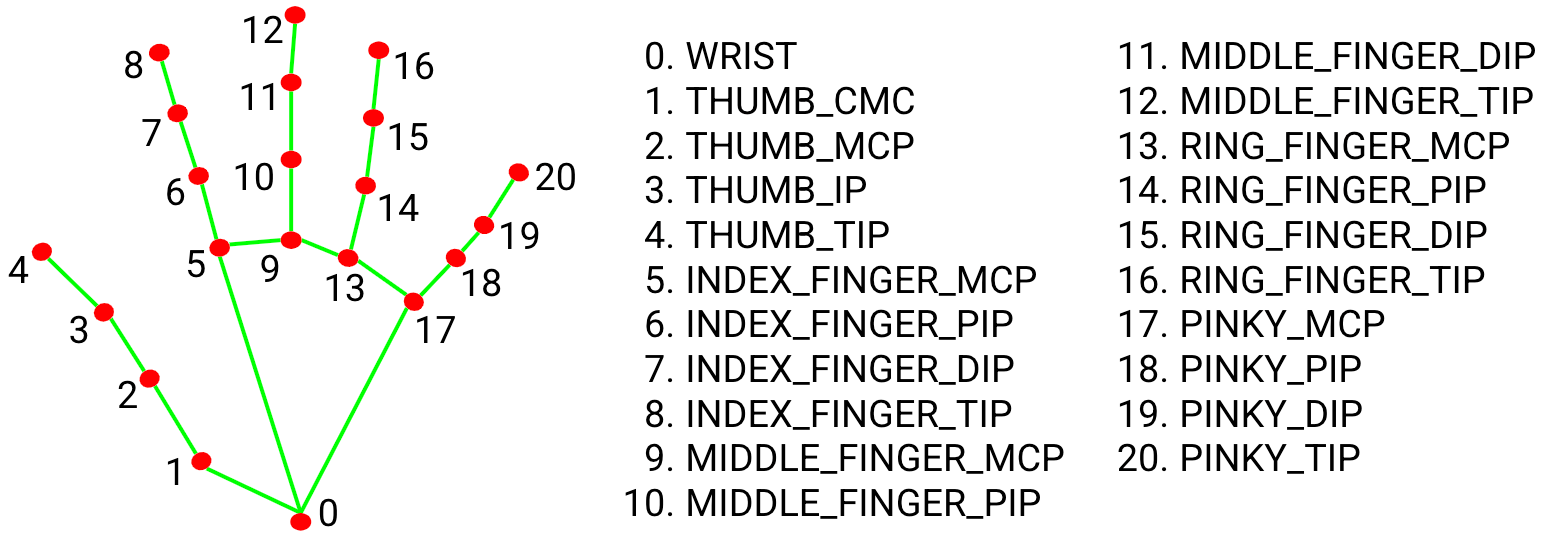
hand_landmarks
根据上图,手点的英文可以归纳为:

  • thumb【大拇指】,index【食指】,middle【中指】,ring【无名指】,pinky【小指】
  • wrist【掌根】,mcp【指根】,tip【指尖】

模型返回的是一个二维数组,包含左手21个点的xyz坐标,右手21个点的xyz坐标

四、AR魔法盾实现

这里主要参考了油管上这位up主,并做了调整改进,主要区别在于:

  • up主是用python在本地摄像头上实现的,我调整成了整合前端的webrtc方式
  • up主后半段代码有些乱,我重新对结构进行了调整优化

1.加载模型和魔法盾图片

1
2
3
MODEL_PATH = f"{Path(__file__).parent.parent}/model/hand_landmarker.task"
SHIELD_1 = cv2.imread(f"{Path(__file__).parent.parent}/asserts/magic_circle_ccw.png", -1)
SHIELD_2 = cv2.imread(f"{Path(__file__).parent.parent}/asserts/magic_circle_cw.png", -1)

魔法盾的图片长这样:

2.模型初始化

num_hands最多同时侦测2只手,Delegate可以选择CPU或GPU

1
2
3
4
5
6
7
def init_detector(callback):
logger.info("init detector")
base_options = BaseOptions(model_asset_path=MODEL_PATH, delegate=BaseOptions.Delegate.GPU)
options = HandLandmarkerOptions(base_options=base_options, running_mode=VisionRunningMode.LIVE_STREAM,
num_hands=2,
result_callback=callback)
return HandLandmarker.create_from_options(options)

3.opencv读取视频帧,并传入模型进行推理

1
2
3
4
5
image = cv2.flip(frame, 1)
image_for_detect = mp.Image(image_format=mp.ImageFormat.SRGBA, data=cv2.cvtColor(image, cv2.COLOR_BGR2RGBA))

self.timestamp += 1
detector.detect_async(image_for_detect, self.timestamp)

4.解析模型输出

1
2
3
4
5
6
7
8
9
10
11
12
13
14
15
16
17
18
19
20
h, w, c = image.shape
for index, hand_landmark in enumerate(self.result.hand_landmarks):
hand = self.hand0 if index == 0 else self.hand1

# set hand landmarks data
lm_list = []
for idx, lm in enumerate(hand_landmark):
coor_x, coor_y = int(lm.x * w), int(lm.y * h)
lm_list.append([coor_x, coor_y])
self.set_position_data(lm_list, hand)

def set_position_data(self, lmlist, hand):
hand["wrist"] = (lmlist[0][0], lmlist[0][1])
hand["thumb_tip"] = (lmlist[4][0], lmlist[4][1])
hand["index_mcp"] = (lmlist[5][0], lmlist[5][1])
hand["index_tip"] = (lmlist[8][0], lmlist[8][1])
hand["midle_mcp"] = (lmlist[9][0], lmlist[9][1])
hand["midle_tip"] = (lmlist[12][0], lmlist[12][1])
hand["ring_tip"] = (lmlist[16][0], lmlist[16][1])
hand["pinky_tip"] = (lmlist[20][0], lmlist[20][1])

5.计算单只手的张开比例

手的张开比例ratio = hand_open距离 / hand_close距离

hand_open距离 = 食指指尖到小指指尖的距离,其实换成大拇指指尖应该也可以

hand_close距离 = 掌根到食指指根距离

1
2
3
4
5
6
7
8
9
10
11
12
13
14
15
# calculate distance and ratio
ratio, hand_close, hand_open = self.calc_ratio(hand)

def calc_ratio(self, hand):
wrist = hand["wrist"]
index_mcp = hand["index_mcp"]
index_tip = hand["index_tip"]
pinky_tip = hand["pinky_tip"]
hand_close = self.calc_distance(wrist, index_mcp)
hand_open = self.calc_distance(index_tip, pinky_tip)
return hand_open / hand_close, hand_close, hand_open

def calc_distance(self, p1, p2):
x1, y1, x2, y2 = p1[0], p1[1], p2[0], p2[1]
return ((x2 - x1) ** 2 + (y2 - y1) ** 2) ** (1.0 / 2)

6.如果ratio在0.5~阈值之间,则显示手指连线;超过阈值则显示魔法盾

1
2
3
4
5
6
7
8
9
10
# draw hand lines or show shield
if ratio and (0.5 < ratio < SHOW_SHIELD_RATIO):
self.draw_hand_lines(image, hand)
if ratio and ratio > SHOW_SHIELD_RATIO:
logger.info("show shield")
x1, y1, diameter, shield_size = self.calc_shield_position(image, hand, hand_close)
rotated1, rotated2 = self.get_rotated_image()
if diameter != 0:
image = self.transparent(rotated1, x1, y1, image, shield_size)
image = self.transparent(rotated2, x1, y1, image, shield_size)

7.计算魔法盾显示位置和尺寸

以中指指根为圆心坐标,手掌闭合时的距离放大一定比例作为直径,来计算出左上顶点的坐标,并保证直径和左上顶点不会超过图片的宽和高

1
2
3
4
5
6
7
8
9
10
11
12
13
14
15
16
17
18
19
20
21
22
23
x1, y1, diameter, shield_size = self.calc_shield_position(image, hand, hand_close)

def calc_shield_position(self, image, hand, hand_close):
midle_mcp = hand["midle_mcp"]
center_x, center_y = midle_mcp
diameter = round(hand_close * SHIELD_SCALE)
x1 = round(center_x - (diameter / 2)) # shield left
y1 = round(center_y - (diameter / 2)) # shield top
h, w, c = image.shape
if x1 < 0:
x1 = 0
elif x1 > w:
x1 = w
if y1 < 0:
y1 = 0
elif y1 > h:
y1 = h
if x1 + diameter > w:
diameter = w - x1
if y1 + diameter > h:
diameter = h - y1
shield_size = diameter, diameter
return x1, y1, diameter, shield_size

8.获取旋转一定角度的图片

self.deg是实例属性,ANG_VEL为角速度,搭配旋转矩阵和仿射变换,每次都可以让图片旋转一定角度

1
2
3
4
5
6
7
8
9
10
11
def get_rotated_image(self):
self.deg += ANG_VEL
if self.deg > 360:
self.deg = 0
hei, wid, col = SHIELD_1.shape # SHIELD_1和SHIELD_2尺寸相同
cen = (wid // 2, hei // 2)
M1 = cv2.getRotationMatrix2D(cen, round(self.deg), 1.0)
M2 = cv2.getRotationMatrix2D(cen, round(360 - self.deg), 1.0)
rotated1 = cv2.warpAffine(SHIELD_1, M1, (wid, hei))
rotated2 = cv2.warpAffine(SHIELD_2, M2, (wid, hei))
return rotated1, rotated2

9.合成视频帧

根据计算出的shield_size,对shield img做resize,并取出alpha通道做中值模糊,作为后续合成的mask。

根据左上顶点坐标,在原图中裁剪出shield img大小的区域,作为背景;shield img则作为前景,两者进行图片合成

将合成后的图片重新填充回原始图片,然后作为视频帧返回

1
2
3
4
5
6
7
8
9
10
11
12
13
14
15
16
def transparent(self, shield_img, x, y, image, size=None):
if size is not None:
shield_img = cv2.resize(shield_img, size)

original_image = image.copy()
b, g, r, a = cv2.split(shield_img)
overlay_color = cv2.merge((b, g, r))
mask = cv2.medianBlur(a, 1)
h, w, _ = overlay_color.shape
roi = original_image[y:y + h, x:x + w]

img1_bg = cv2.bitwise_and(roi.copy(), roi.copy(), mask=cv2.bitwise_not(mask))
img2_fg = cv2.bitwise_and(overlay_color, overlay_color, mask=mask)
original_image[y:y + h, x:x + w] = cv2.add(img1_bg, img2_fg)

return original_image

至此整个后处理过程完成,完整代码可参考前端 后端

五、遇到的问题

1.ImportError: libGL.so.1: cannot open shared object file: No such file or directory

python版opencv有4种包:opencv-python、opencv-contrib-python、opencv-python-headless、opencv-contrib-python-headless,官方建议只安装4种中的1种。而mediapipe目前包含的是opencv-contrib-python,如果已经安装了其他版本的包,则可能会冲突
opencv_version
其实如果在server端使用opencv的话,官方更推荐headless版的,它不包含GUI功能,更小更轻量,但遗憾的是,mediapipe目前还未提供对headless包的支持:相关issue

2.在云服务器上的ICE Connection Fails

ice通信需要用到udp端口,一开始没有在防火墙上开启,开启后就连接正常了:相关信息

3.No accelerated colorspace conversion found from yuv420p to bgr24

平台相关问题,在我的Mac M1上遇到了,而在云服务器上是好的。视频流在传输过程中用的yuv格式,而opencv在转码时用到了ffmpeg。根据目前查到的信息,Mac的ffmpeg在底层加速时用了quick time,似乎需要更新quick time才能解决。

4.RuntimeWarning: As the c extension couldn’t be imported, google-crc32c is using a pure python implementation that is significantly slower. If possible, please configure a c build environment and compile the extension

暂未解决

5.Feedback manager requires a model with a single signature inference. Disabling support for feedback tensors

暂未解决

六、有待改进的地方

1.实际测试中,发现signaling花费的时间较长,存在优化空间

2.后端代码运行后,CPU和GPU占用率都很高,可以进一步优化,比如对待处理的视频帧进行缩小,减少计算的数据量

3.server端配置一般,算力有待提高

4.魔法盾的实现代码中,部分算法可以优化,个别阈值也是写死的,可以进一步调优

5.整体效果上,还可以用seg模型进行背景替换,比如换成卡玛泰姬或电影中的场景,会更逼真

七、思考

因为自己不玩抖音小红书之类的,所以一开始对于这种华而不实的AR特效并不关注,以为cv只能在工业领域用到,倒是老婆的一句“这多好玩啊”让我如梦初醒,想想当初,很大程度上,自己也是因为能亲手做出各种好玩的页面效果而选择转行前端,现在回过头来看,初衷原来如此简单纯粹。好玩,也许才是真正源源不断的内在驱动力。

参考文章:

WebRTC 协议介绍

WebRTC connectivity

Codecs used by WebRTC

WebRTC NAT Traversal Methods: A Case for Embedded TURN

Python WebRTC basics with aiortc

Add support for WebRTC Data Channel in Workers

Python 手部特征点检测指南

WEBRTC DATA CHANNELS

WebRTC with Python & React: Building Real-Time Communication Applications

From Zero to Hero with WebRTC in JavaScript and Python in small snippets of code